
EVA Narrative – December 7th
EVA Narrative: Canyon, Silence and Us
By Crew Biologist Anushree Srivastava
Yesterday morning, Jon, Annalea, Anastasiya and I headed for another adventurous EVA. This EVA was in semi-simulation because the site of interest was 75 km away from our habitat and generally accessible to the public. We started gearing up at 10 am. The EVA team entered into the airlock at 10:30 am and started five minutes depressurization. After depressurization was over, we were ready to move to implement our research objectives on field. Since we were supposed to travel 75 km, we took the PEV (Pressurised Exploration Vehicle) to reach the location.
This EVA was supposed to be conducted at an immensely beautiful and peaceful canyon. We headed for EVA with two research goals in mind: sample collection from ancient gypsum deposits and field drawing to provide a context for the sampling site.
Gypsum astrobiology is one of our prominent research targets as part of Mars 160 science mission. According to our Crew Geologist Dr Jon Clarke, this site consists of two different formations in the Early Jurassic (200-175 Mya): the upper Carmel, lower Carmel, and Navajo Sandstone formations. The Carmel and Navajo Formations belong to the San Rafael and Glen Canyon Groups, respectively.
The upper Carmel Formation is dominated by pinkish to white gypsum which occurs on metre-scale interbeds with green shales. The gypsum shows a range of textures, including lamination and chicken wire textures. The chicken wire texture suggests that some of the gypsum may originally have been anhydrite. The gypsum has been deformed, possibly during the formation of the San Rafael Swell. Small kinds of folds are locally present and the alternation of shale and gypsum has been disrupted by strata-bound brecciation.
On the other hand, the lower Carmel Formation consists of inter-bedded fine sandstone and red mudstone. The lower part of the sandstone succession shows through cross-bedding. The upper part shows wave ripples, sometimes with worm trails in the troughs. The transition from the lower to the upper part of the Carmel Formation appears gradational, with a transition from fluvial (cross-bedded sandstone) to shallow marine (worm trails in rippled sandstone) to evaporitic lagoon (bedded gypsum and shale).
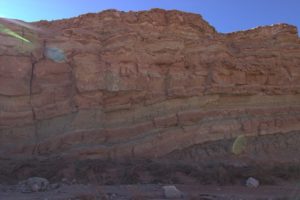
Figure 1: Stratbound brecciation of interbedded gypsum and shale in Carel Formation. Image credit: Dr Jon Clarke
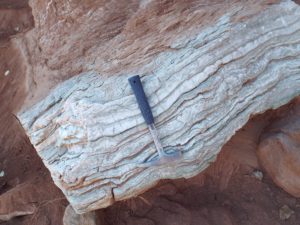
Figure 2: Laminated gypsum of the Carmel Formation. Image credit: Dr Jon Clarke
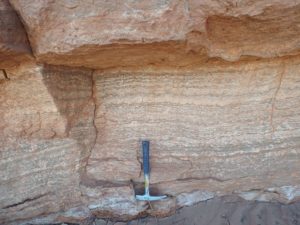
Figure 3: Chicken wire textured gypsum of Carmel Formation, possibly replacing anhydrite. Image credit: Dr Jon Clarke

Figure 4: Kink-folded gypsum of Carmel Formation
The Navajo Sandstone Formation comprises the main ridge of the San Rafael Swell. This canyon is incised into it. During yesterday’s EVA, our access to this formation was blocked by the flood and frozen sections of the slot canyons. The Formation is characterized by fine to medium sandstone with very large scale cross-bedding. This cross bedding is generally recognized as indicating deposition by wind-blown sand dunes.
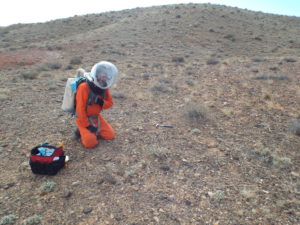
Hence, Jon and I were focused on sampling deposits of gypsum from each geological variation. Anastasiya’s assisted us in sample collection and storage. So far, we have collected gypsum from three historical sites, but personally, the samples collected during yesterday’s excursion are my most favorite. I always prefer to chip off large and thick chunks of evaporite deposits in order to obtain crystals from the very core. This is to be done in the laboratory in a very specialized and sterilized condition. My sole objective behind studying these ancient gypsum crystals is to detect any buried sign of life inside them. Dr Jon Clarke’s help for this study is significant in order to obtain essential geological insights for each sample collected.
On the other hand, Annalea started drawing those laminated gypsum beds. I think field drawing of the sampling site is more efficient compared to the pictures, as the artist tries to carve every little detail in a more dynamic way. For me, field drawing gives the most precise context of the surroundings of the site of interest. Annalea’s drawing of the gypsum beds will be important for this study in the future. Annalea also drew the panorama view of the Kissing Camel Ridge. She also drew the wave ripples on the sandstone and fossilized sinuous worm trails in the troughs of wave ripples. Believe me, it was just amazing!
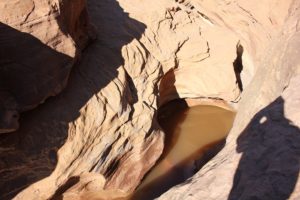
Last but not least, after finishing our objectives for the EVA, we moved forward to see the origin of the canyon cut through the Navajo sandstone. We were actually wonderstruck. The canyon was speaking the language of silence, perhaps telling us the ancient story of catastrophe. There is an inherent beauty in catastrophe.
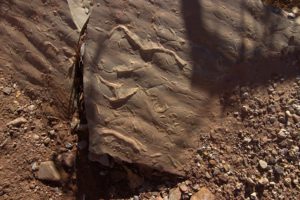
Figure 5: Underside of the loose block of fine-grained sandstone from the lower part of the Carmel Formation showing sinuous worm trails in the troughs of wave ripples. Image Credit: Dr Jon Clarke

Figure 6: Wave ripples on sandstone. Image Credit: Dr Jon Clarke
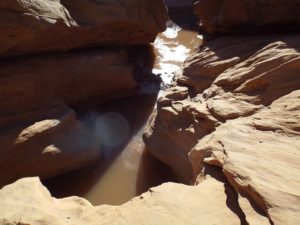
Figure 7: The origin of the beautiful canyon. Image Credit: Dr Jon Clarke